
Starting a mealworm farm is easy and offers a convenient way to feed livestock and earn some income. One of the keys to maintaining the farm of course is regular cleaning. In this guide I will show the things you have to do to ensure your mealworms are in a clean and safe environment.
Replace mealworm bedding every 2-3 weeks and remove frass to avoid buildup. Don’t let the farm get too moist and dispose of uneaten food immediately.
How Often to Change Mealworm Bedding?
Mealworm bedding is usually replaced every 2-3 weeks, but this is more of a general guideline. If the bedding is soiled and has too much waste, replace it immediately.
You have to put new bedding if the current one is moldy, moist or dirty. While 2-3 weeks is the typical frequency, it will really depend on how many mealworms you have, waste production and the habitat conditions. This will happen more often if you add more mealworms for instance.
When mealworm bedding starts to accumulate waste, it can lead to a buildup of ammonia. Ammonia is harmful to the mealworms and can cause serious ailments.
Excessive moisture in the bedding can be a breeding ground for bacteria and mold, putting the mealworms at risk of infections.
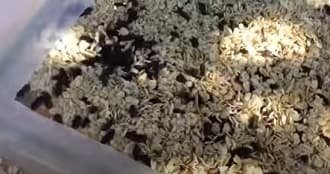
Choosing the right bedding material is also crucial for your mealworms. Common materials used for bedding include oats, wheat bran, cornmeal, or a combination of these. I strongly recommend you use bedding free of additives, pesticides or chemicals that may be harmful to mealworms.
How to Clean Mealworm Bedding
You will need a temporary container for the mealworms and fresh bedding. You will also need a container to properly dispose of the dirty bedding. Wear gloves when handling the mealworms and the soiled bedding. You will also need cleaning tools and materials for the container.
Remove the mealworms and place them in the temporary container. This container should have bedding in it. Leave some food there if you expect cleaning to take a while.
Remove the dirty bedding and dispose of it. Clean the container thoroughly. Use soap and water if necessary. Check for signs of mold, fungi, dead mealworms, frass etc.
If the container is too moist, check if there are holes. Or you can move it to another location. Make any adjustments to the habitat as needed. If there is too much moisture or sunlight and it’s affecting the mealworms, now is the time to move the container somewhere else.
Once the container is clean, you can put the mealworms back in. Add new bedding first before putting them back in place. Make sure the container is well-ventilated, but at the same time there is no opening for the mealworms to escape.
I cannot stress how important it is to keep a mealworm farm clean. If you are feeding mealworms to your hamsters for instance, you have to make sure they are clean. Contaminated mealworms can carry diseases that could seriously afflict your pet, so maintenance is key.
How to Remove Mealworm Frass
Mealworm frass (waste) will accumulate over time. It can be nuisance and could turn into a health risk too. To keep the farm healthy, this has to be removed immediately.
Here is a step by step guide to get rid of mealworm frass:
- Gather your supplies. You will need a pair of gloves, a dustpan, a brush or sponge, a trash bag or bin, and a vacuum cleaner (optional).
- Wear gloves. This is necessary to protect yourself from allergic reactions, germs and bacteria. You have to do this each time you remove frass.
- Remove mealworms from the frass. If there are mealworms in the frass, move them to a temporary container. You can use gloved hands or a scoop. Make sure you only take the mealworms out and not the frass. You don’t want the waste to end up in the temporary bin.
- Use a dustpan or brush. Use a dustpan and brush to sweep the frass off. If the waste has dried and stuck, use a damp sponge or brush to remove them. This usually happens if waste has been left for too long on the surface.
- Dispose of the frass. Once you have collected the frass, place it in a trash bag. Seal the bag tightly to prevent odor or infestation issues. You can also dispose of frass in a compost bin, depending on your local waste management guidelines.
- Clean the area. After removing the frass, clean the area where it accumulated. Use a cleaning agent and a damp cloth or sponge to wipe the surfaces. Pay close attention to any cracks or crevices where frass may have accumulated. How long this takes depends on the container size and waste buildup.
- Vacuum (optional): If you want a more thorough clean, use a vacuum cleaner to suck up any remaining debris. This can be particularly effective if the frass is in hard-to-reach areas or carpeted surfaces.
I often get asked how often to remove mealworm frass. Usually every week or every two weeks is fine. But you also have to keep an eye on the mealworms. If they produce a lot of waste, you will have to do it more often. But if their waste production is typical, a weekly or bi-weekly schedule is sufficient.
What matters is that frass, leftover food and other debris are removed regularly. This is essential to keep your mealworms healthy. Whether you sell mealworms or use them as animal feed, cleanliness is a must.
How to Keep Mealworm Farms Clean
Keeping a mealworm farm clean is essential to maintain the health of the mealworms and minimize any potential odors or infestations. Here are a few tips on how to keep your mealworm farm clean:
- Use a clean and dedicated container. A clean, transparent container with a tight-fitting lid is the best choice. It ensures the mealworms are well-contained and cannot escape. A transparent bin also lets you see the waste buildup or leftover food.
- Regularly remove waste and dead mealworms. Do this and most threats of mold, fungi, bacteria and parasites will disappear.
- Bedding maintenance: Whether you go for weekly or bi-weekly, what’s important is to replace the bedding regularly.
- Manage moisture levels: Mealworms need some moisture, but too much can precipitate mold. You have to monitor this and make the proper adjustments.
- Regularly clean feeding and watering containers. This is necessary to prevent food decay and mildew. Remove any uneaten food within 24 hours to avoid attracting pests like mites or flies. Replenish their water supply as well.
- Maintain proper temperature. Mealworms thrive in temperatures between 70-80°F (21-27°C). Avoid exposing the mealworm farm to extreme heat or cold as it can lead to bacterial growth.
- Minimize cross-contamination. To prevent the spread of disease or pests, avoid cross-contamination between different containers or colonies. If you need to handle or move mealworms between containers, make sure your hands and tools are clean and sanitized.
- Inspect for pests and disease. You have to routinely check for signs of pests like mites. Remove them immediately if detected. Check the mealworms for any signs of disease, discoloration or abnormal behavior. Quarantine infected mealworms to prevent the spread of illness.
- Keep the mealworm farm in a well-ventilated area. Proper ventilation helps maintain airflow and prevents the buildup of moisture and odors. Do not place mealworms in dark and unventilated areas.
- Wash hands and sanitize equipment. Wash your hands before and after handling anything in the farm. Regularly sanitize any equipment used, such as scoops or feeding utensils.
Conclusion
Cleaning a mealworm farm does not take too much effort. Once you get started it becomes second nature. And the little effort required for this makes a huge difference in terms of your mealworms’ health. By regularly cleaning and maintaining their bedding, your mealworms will thrive.